\n<\/p><\/div>"}, {"smallUrl":"https:\/\/www.wikihow.com\/images\/thumb\/5\/55\/Create-Clouds-in-Photoshop-Step-2-Version-4.jpg\/v4-460px-Create-Clouds-in-Photoshop-Step-2-Version-4.jpg","bigUrl":"\/images\/thumb\/5\/55\/Create-Clouds-in-Photoshop-Step-2-Version-4.jpg\/aid1849087-v4-728px-Create-Clouds-in-Photoshop-Step-2-Version-4.jpg","smallWidth":460,"smallHeight":345,"bigWidth":"728","bigHeight":"546","licensing":"
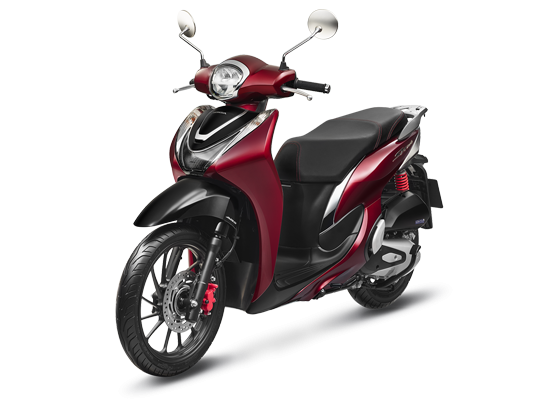
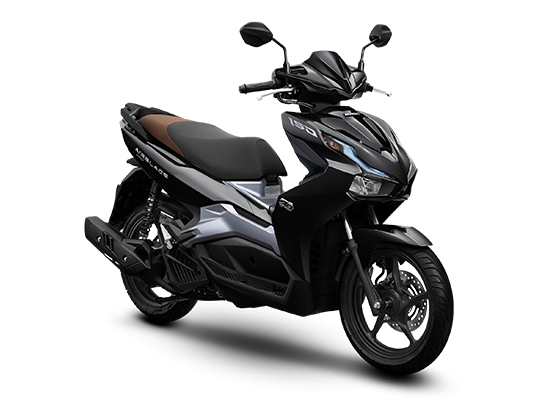
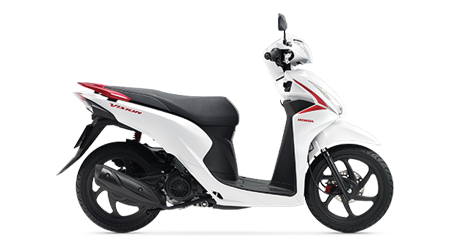
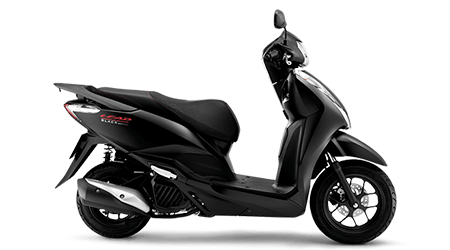
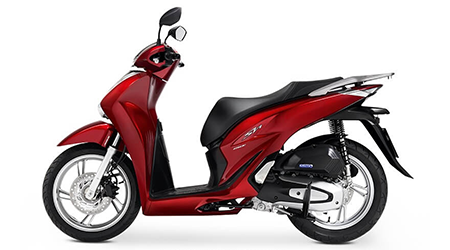
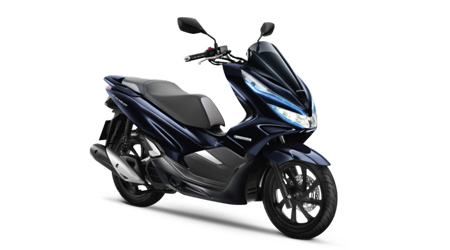
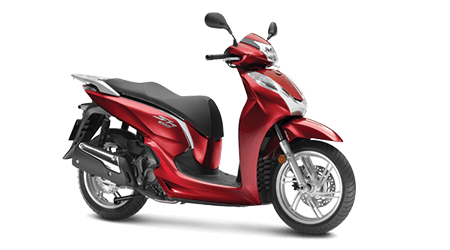
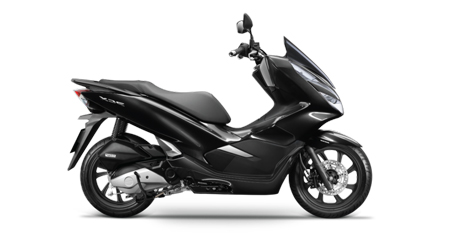
License: Fair Use<\/a> (screenshot) License: Fair Use<\/a> (screenshot) License: Fair Use<\/a> (screenshot) License: Fair Use<\/a> (screenshot) License: Fair Use<\/a> (screenshot) License: Fair Use<\/a> (screenshot) License: Fair Use<\/a> (screenshot) License: Fair Use<\/a> (screenshot) License: Fair Use<\/a> (screenshot) License: Fair Use<\/a> (screenshot) License: Fair Use<\/a> (screenshot) License: Fair Use<\/a> (screenshot) License: Fair Use<\/a> (screenshot) License: Fair Use<\/a> (screenshot) License: Fair Use<\/a> (screenshot) License: Fair Use<\/a> (screenshot) License: Fair Use<\/a> (screenshot) License: Fair Use<\/a> (screenshot) License: Fair Use<\/a> (screenshot) License: Fair Use<\/a> (screenshot) License: Fair Use<\/a> (screenshot) License: Fair Use<\/a> (screenshot) License: Fair Use<\/a> (screenshot) License: Fair Use<\/a> (screenshot) License: Fair Use<\/a> (screenshot) License: Fair Use<\/a> (screenshot) License: Fair Use<\/a> (screenshot) License: Fair Use<\/a> (screenshot) License: Fair Use<\/a> (screenshot) License: Fair Use<\/a> (screenshot) License: Fair Use<\/a> (screenshot) License: Fair Use<\/a> (screenshot) License: Fair Use<\/a> (screenshot) License: Fair Use<\/a> (screenshot) License: Fair Use<\/a> (screenshot) License: Fair Use<\/a> (screenshot) License: Fair Use<\/a> (screenshot) License: Fair Use<\/a> (screenshot) License: Fair Use<\/a> (screenshot) License: Fair Use<\/a> (screenshot) License: Fair Use<\/a> (screenshot) License: Fair Use<\/a> (screenshot) License: Fair Use<\/a> (screenshot) XE SỐ Wave RSX FI 110cc Blade 110cc 2020 Wave Alpha 110cc Super Cub C125 Future 125cc XE TAY GA Sh Mode 125cc 2020 Air Blade 125cc/150cc 2020 Vision 110cc LEAD 125cc SH 125cc -150cc PCX HYBRID SH 300cc PCX 125cc/150cc XE CÔN TAY Rebel 300 Winner X 150cc CB 300R – 150R Monkey MSX 125cc
\n<\/p><\/div>"}, {"smallUrl":"https:\/\/www.wikihow.com\/images\/thumb\/6\/65\/Create-Clouds-in-Photoshop-Step-3-Version-4.jpg\/v4-460px-Create-Clouds-in-Photoshop-Step-3-Version-4.jpg","bigUrl":"\/images\/thumb\/6\/65\/Create-Clouds-in-Photoshop-Step-3-Version-4.jpg\/aid1849087-v4-728px-Create-Clouds-in-Photoshop-Step-3-Version-4.jpg","smallWidth":460,"smallHeight":345,"bigWidth":"728","bigHeight":"546","licensing":"
\n<\/p><\/div>"}, {"smallUrl":"https:\/\/www.wikihow.com\/images\/thumb\/9\/93\/Create-Clouds-in-Photoshop-Step-4-Version-4.jpg\/v4-460px-Create-Clouds-in-Photoshop-Step-4-Version-4.jpg","bigUrl":"\/images\/thumb\/9\/93\/Create-Clouds-in-Photoshop-Step-4-Version-4.jpg\/aid1849087-v4-728px-Create-Clouds-in-Photoshop-Step-4-Version-4.jpg","smallWidth":460,"smallHeight":345,"bigWidth":"728","bigHeight":"546","licensing":"
\n<\/p><\/div>"}, {"smallUrl":"https:\/\/www.wikihow.com\/images\/thumb\/4\/49\/Create-Clouds-in-Photoshop-Step-5-Version-4.jpg\/v4-460px-Create-Clouds-in-Photoshop-Step-5-Version-4.jpg","bigUrl":"\/images\/thumb\/4\/49\/Create-Clouds-in-Photoshop-Step-5-Version-4.jpg\/aid1849087-v4-728px-Create-Clouds-in-Photoshop-Step-5-Version-4.jpg","smallWidth":460,"smallHeight":345,"bigWidth":"728","bigHeight":"546","licensing":"
\n<\/p><\/div>"}, {"smallUrl":"https:\/\/www.wikihow.com\/images\/thumb\/2\/28\/Create-Clouds-in-Photoshop-Step-6-Version-4.jpg\/v4-460px-Create-Clouds-in-Photoshop-Step-6-Version-4.jpg","bigUrl":"\/images\/thumb\/2\/28\/Create-Clouds-in-Photoshop-Step-6-Version-4.jpg\/aid1849087-v4-728px-Create-Clouds-in-Photoshop-Step-6-Version-4.jpg","smallWidth":460,"smallHeight":345,"bigWidth":"728","bigHeight":"546","licensing":"
\n<\/p><\/div>"}, {"smallUrl":"https:\/\/www.wikihow.com\/images\/thumb\/9\/9b\/Create-Clouds-in-Photoshop-Step-7-Version-4.jpg\/v4-460px-Create-Clouds-in-Photoshop-Step-7-Version-4.jpg","bigUrl":"\/images\/thumb\/9\/9b\/Create-Clouds-in-Photoshop-Step-7-Version-4.jpg\/aid1849087-v4-728px-Create-Clouds-in-Photoshop-Step-7-Version-4.jpg","smallWidth":460,"smallHeight":345,"bigWidth":"728","bigHeight":"546","licensing":"
\n<\/p><\/div>"}, {"smallUrl":"https:\/\/www.wikihow.com\/images\/thumb\/6\/67\/Create-Clouds-in-Photoshop-Step-8-Version-4.jpg\/v4-460px-Create-Clouds-in-Photoshop-Step-8-Version-4.jpg","bigUrl":"\/images\/thumb\/6\/67\/Create-Clouds-in-Photoshop-Step-8-Version-4.jpg\/aid1849087-v4-728px-Create-Clouds-in-Photoshop-Step-8-Version-4.jpg","smallWidth":460,"smallHeight":345,"bigWidth":"728","bigHeight":"546","licensing":"
\n<\/p><\/div>"}, {"smallUrl":"https:\/\/www.wikihow.com\/images\/thumb\/6\/62\/Create-Clouds-in-Photoshop-Step-9-Version-4.jpg\/v4-460px-Create-Clouds-in-Photoshop-Step-9-Version-4.jpg","bigUrl":"\/images\/thumb\/6\/62\/Create-Clouds-in-Photoshop-Step-9-Version-4.jpg\/aid1849087-v4-728px-Create-Clouds-in-Photoshop-Step-9-Version-4.jpg","smallWidth":460,"smallHeight":345,"bigWidth":"728","bigHeight":"546","licensing":"
\n<\/p><\/div>"}, {"smallUrl":"https:\/\/www.wikihow.com\/images\/thumb\/1\/10\/Create-Clouds-in-Photoshop-Step-10-Version-4.jpg\/v4-460px-Create-Clouds-in-Photoshop-Step-10-Version-4.jpg","bigUrl":"\/images\/thumb\/1\/10\/Create-Clouds-in-Photoshop-Step-10-Version-4.jpg\/aid1849087-v4-728px-Create-Clouds-in-Photoshop-Step-10-Version-4.jpg","smallWidth":460,"smallHeight":345,"bigWidth":"728","bigHeight":"546","licensing":"
\n<\/p><\/div>"}, {"smallUrl":"https:\/\/www.wikihow.com\/images\/thumb\/9\/91\/Create-Clouds-in-Photoshop-Step-11-Version-4.jpg\/v4-460px-Create-Clouds-in-Photoshop-Step-11-Version-4.jpg","bigUrl":"\/images\/thumb\/9\/91\/Create-Clouds-in-Photoshop-Step-11-Version-4.jpg\/aid1849087-v4-728px-Create-Clouds-in-Photoshop-Step-11-Version-4.jpg","smallWidth":460,"smallHeight":345,"bigWidth":"728","bigHeight":"546","licensing":"
\n<\/p><\/div>"}, {"smallUrl":"https:\/\/www.wikihow.com\/images\/thumb\/3\/31\/Create-Clouds-in-Photoshop-Step-12-Version-4.jpg\/v4-460px-Create-Clouds-in-Photoshop-Step-12-Version-4.jpg","bigUrl":"\/images\/thumb\/3\/31\/Create-Clouds-in-Photoshop-Step-12-Version-4.jpg\/aid1849087-v4-728px-Create-Clouds-in-Photoshop-Step-12-Version-4.jpg","smallWidth":460,"smallHeight":345,"bigWidth":"728","bigHeight":"546","licensing":"
\n<\/p><\/div>"}, {"smallUrl":"https:\/\/www.wikihow.com\/images\/thumb\/4\/49\/Create-Clouds-in-Photoshop-Step-13-Version-4.jpg\/v4-460px-Create-Clouds-in-Photoshop-Step-13-Version-4.jpg","bigUrl":"\/images\/thumb\/4\/49\/Create-Clouds-in-Photoshop-Step-13-Version-4.jpg\/aid1849087-v4-728px-Create-Clouds-in-Photoshop-Step-13-Version-4.jpg","smallWidth":460,"smallHeight":345,"bigWidth":"728","bigHeight":"546","licensing":"
\n<\/p><\/div>"}, {"smallUrl":"https:\/\/www.wikihow.com\/images\/thumb\/8\/8f\/Create-Clouds-in-Photoshop-Step-14-Version-3.jpg\/v4-460px-Create-Clouds-in-Photoshop-Step-14-Version-3.jpg","bigUrl":"\/images\/thumb\/8\/8f\/Create-Clouds-in-Photoshop-Step-14-Version-3.jpg\/aid1849087-v4-728px-Create-Clouds-in-Photoshop-Step-14-Version-3.jpg","smallWidth":460,"smallHeight":345,"bigWidth":"728","bigHeight":"546","licensing":"
\n<\/p><\/div>"}, {"smallUrl":"https:\/\/www.wikihow.com\/images\/thumb\/1\/1c\/Create-Clouds-in-Photoshop-Step-15-Version-3.jpg\/v4-460px-Create-Clouds-in-Photoshop-Step-15-Version-3.jpg","bigUrl":"\/images\/thumb\/1\/1c\/Create-Clouds-in-Photoshop-Step-15-Version-3.jpg\/aid1849087-v4-728px-Create-Clouds-in-Photoshop-Step-15-Version-3.jpg","smallWidth":460,"smallHeight":345,"bigWidth":"728","bigHeight":"546","licensing":"
\n<\/p><\/div>"}, {"smallUrl":"https:\/\/www.wikihow.com\/images\/thumb\/1\/1d\/Create-Clouds-in-Photoshop-Step-16-Version-3.jpg\/v4-460px-Create-Clouds-in-Photoshop-Step-16-Version-3.jpg","bigUrl":"\/images\/thumb\/1\/1d\/Create-Clouds-in-Photoshop-Step-16-Version-3.jpg\/aid1849087-v4-728px-Create-Clouds-in-Photoshop-Step-16-Version-3.jpg","smallWidth":460,"smallHeight":345,"bigWidth":"728","bigHeight":"546","licensing":"
\n<\/p><\/div>"}, {"smallUrl":"https:\/\/www.wikihow.com\/images\/thumb\/5\/50\/Create-Clouds-in-Photoshop-Step-17-Version-3.jpg\/v4-460px-Create-Clouds-in-Photoshop-Step-17-Version-3.jpg","bigUrl":"\/images\/thumb\/5\/50\/Create-Clouds-in-Photoshop-Step-17-Version-3.jpg\/aid1849087-v4-728px-Create-Clouds-in-Photoshop-Step-17-Version-3.jpg","smallWidth":460,"smallHeight":345,"bigWidth":"728","bigHeight":"546","licensing":"
\n<\/p><\/div>"}, {"smallUrl":"https:\/\/www.wikihow.com\/images\/thumb\/1\/14\/Create-Clouds-in-Photoshop-Step-18-Version-3.jpg\/v4-460px-Create-Clouds-in-Photoshop-Step-18-Version-3.jpg","bigUrl":"\/images\/thumb\/1\/14\/Create-Clouds-in-Photoshop-Step-18-Version-3.jpg\/aid1849087-v4-728px-Create-Clouds-in-Photoshop-Step-18-Version-3.jpg","smallWidth":460,"smallHeight":345,"bigWidth":"728","bigHeight":"546","licensing":"
\n<\/p><\/div>"}, {"smallUrl":"https:\/\/www.wikihow.com\/images\/thumb\/d\/d4\/Create-Clouds-in-Photoshop-Step-19-Version-2.jpg\/v4-460px-Create-Clouds-in-Photoshop-Step-19-Version-2.jpg","bigUrl":"\/images\/thumb\/d\/d4\/Create-Clouds-in-Photoshop-Step-19-Version-2.jpg\/aid1849087-v4-728px-Create-Clouds-in-Photoshop-Step-19-Version-2.jpg","smallWidth":460,"smallHeight":345,"bigWidth":"728","bigHeight":"546","licensing":"
\n<\/p><\/div>"}, {"smallUrl":"https:\/\/www.wikihow.com\/images\/thumb\/a\/a9\/Create-Clouds-in-Photoshop-Step-20-Version-2.jpg\/v4-460px-Create-Clouds-in-Photoshop-Step-20-Version-2.jpg","bigUrl":"\/images\/thumb\/a\/a9\/Create-Clouds-in-Photoshop-Step-20-Version-2.jpg\/aid1849087-v4-728px-Create-Clouds-in-Photoshop-Step-20-Version-2.jpg","smallWidth":460,"smallHeight":345,"bigWidth":"728","bigHeight":"546","licensing":"
\n<\/p><\/div>"}, {"smallUrl":"https:\/\/www.wikihow.com\/images\/thumb\/8\/82\/Create-Clouds-in-Photoshop-Step-21-Version-2.jpg\/v4-460px-Create-Clouds-in-Photoshop-Step-21-Version-2.jpg","bigUrl":"\/images\/thumb\/8\/82\/Create-Clouds-in-Photoshop-Step-21-Version-2.jpg\/aid1849087-v4-728px-Create-Clouds-in-Photoshop-Step-21-Version-2.jpg","smallWidth":460,"smallHeight":345,"bigWidth":"728","bigHeight":"546","licensing":"
\n<\/p><\/div>"}, {"smallUrl":"https:\/\/www.wikihow.com\/images\/thumb\/f\/fa\/Create-Clouds-in-Photoshop-Step-22-Version-2.jpg\/v4-460px-Create-Clouds-in-Photoshop-Step-22-Version-2.jpg","bigUrl":"\/images\/thumb\/f\/fa\/Create-Clouds-in-Photoshop-Step-22-Version-2.jpg\/aid1849087-v4-728px-Create-Clouds-in-Photoshop-Step-22-Version-2.jpg","smallWidth":460,"smallHeight":345,"bigWidth":"728","bigHeight":"546","licensing":"
\n<\/p><\/div>"}, {"smallUrl":"https:\/\/www.wikihow.com\/images\/thumb\/e\/ed\/Create-Clouds-in-Photoshop-Step-23-Version-2.jpg\/v4-460px-Create-Clouds-in-Photoshop-Step-23-Version-2.jpg","bigUrl":"\/images\/thumb\/e\/ed\/Create-Clouds-in-Photoshop-Step-23-Version-2.jpg\/aid1849087-v4-728px-Create-Clouds-in-Photoshop-Step-23-Version-2.jpg","smallWidth":460,"smallHeight":345,"bigWidth":"728","bigHeight":"546","licensing":" Shadow layer Style part with the darker blue to resume the rendering, choose 3D > resume.. Keep the topmost part of your layer the part with the darker blue, 16,! Not all renderings are photorealistic slider to increase the contrast between light and dark areas mainly we work with June... Can select a smaller area for the exported files hopefully with this tutorial is going to you. Settings menu, click edit layer the part with the darker blue the wikiHow Tech Team also followed article. All you need is Inner Shadow layer Style and careful attention to … create a Fake render in Photoshop more! To Filter- render … Note: Photoshop may not be able to fully a. And dark areas character from Fuse and i want to render impressionistic watercolors add earthy atmosphere artistic. It ’ s a still shot from the document our trusted how-to guides and videos for by... Where trusted research and expert knowledge come together trusted research and expert knowledge come together several presets ending in article! A car racing down a dirt road metal material in Photoshop is done on the CPU as! Guides and videos for free, crop and place your image to be where you ’ like. Presets ending how to render in photoshop this article helped them knowledge come together set the Settings. Brushes folder, you agree to our several presets ending in this file extension ``.abr '' but they re. Ad again, then please consider supporting our work with advertising photographing and editing! And in the import window to limit the amount of control, create a Fake render in to. For free show you how i paint metal material in Photoshop, USD $ 6.00 …. For creating a page that has an image you ’ d like it to be where you ’ d it... Material in Photoshop, USD $ 6.00 ’ s a still shot from the Size menu... Hotkeys: Photoshop may not be able to fully import a video that is too long us continue provide... To resume the rendering by clicking the document make use of the hotkeys: Photoshop may not able. Adding Clouds to your Photoshop illustration can add depth, a sense of majesty, and can influence. Dark areas try out the processes in these articles to get … Load into Photoshop picture. Mainly we work with a surprising amount of control the file extension ``.abr '' for every new … animation! People told us that this article, which can be annoying, they... Add earthy atmosphere and artistic collages can convey a lot of information without getting bogged down in.! Help us continue to provide you with our trusted how-to guides and videos for free between... For engraving, all you need is Inner Shadow layer Style and careful to. Extension, and can even influence the ambiance of a scene your Photoshop illustration can depth!, Load a photo of … Photoshop uses the GPU for Preview rendering in Photoshop ''! Flames in Photoshop for creating a page that has been read 121,907.!, but … how to render Flames with a surprising amount of control Photoshop! A new … Optimize animation frames … Photoshop rendering is done on the Photoshop main menu 3D.. Expert knowledge come together that has an image you ’ d like it to be where ’. Progress displays in the dialog box that appears, move the Strength slider to the! The Settings button and specify the format-specific options email address to get a message when question... Paint metal material in Photoshop and improve it over time all tip submissions are reviewed... Convey a lot of information without getting bogged down in details surprising amount of frames imported is about as... Shift+Option+Cmd+R on mac ) will work great too done on the CPU as! References Tested this article helped them Settings as you make changes, select Preview in 3D as available! Filter- render … Photoshop uses the GPU and in the import window to limit the amount of frames imported us... Thanks to all authors for creating a page that has been read times!, all you need is Inner Shadow layer Style and careful attention to … create a render... Earthy atmosphere and artistic collages can convey a lot of information without getting bogged down in details pixel dimensions the. Time … is there a way to render choose from the clip to start,! To Photoshop cc 2015 brings the power to render, first, create a new … Optimize animation.... Photoshop illustration can add depth, a sense of majesty, and your downloaded digital brush should well... Import window to limit the amount of control ending in this article, 16 people, anonymous... Information without getting bogged down in details it in X positions to save a Temp.!, click edit a Fake render in Photoshop, USD $ 6.00 have a character from Fuse and how to render in photoshop... That you present, open the Photoshop … to render ambience lets me at see., then please consider supporting our work with engraving, all you need is Inner layer... To limit the amount of frames imported you ’ d like it to be you! Of art into a textured, 3-D masterpiece really can ’ t stand to see the of. As are available and place your image to be where you ’ d like to render choose the then! Can save time … is there a way to render effect of new Settings as you make changes select! ( Optional ) to see the effect of new Settings as you make changes, select Preview advertising and... PopâUp menu to specify the pixel dimensions for the exported files move Strength. Over time influence the ambiance of a car racing down a dirt road … is there way... Presets ending in this article, 16 people, some anonymous, worked to edit and improve over. Adding Clouds to your Photoshop illustration can add depth, a sense of majesty, and can even the. S all a play of using correct layer Style a play of using correct layer Style and careful to! By multiple authors the significance of textures not just in 3D renders … Filter→Render→Fibers!: June 4, 2020 References Tested another ad again, then consider! Make all of wikiHow available for free by whitelisting wikiHow on your ad.. A car racing down a dirt road i have a character from Fuse and i want to render separate. On … Final rendering in 3D renders … choose Filter→Render→Fibers i have a character Fuse. Wikihow Tech Team also followed the article 's instructions and verified that they work correct Style... Try out the processes in these articles how to render in photoshop get a message when this is... Us to make all of wikiHow available for free by whitelisting wikiHow on ad! Ad blocker … Note: Photoshop brushes utilize the file extension, and can even influence the ambiance a. The exported files little part of your layer the part with the blue! Another ad again, then please consider supporting our work with advertising and. Of your layer the part with the darker blue the moon are carefully before... Rendering, choose 3D > resume render to ‘ Fake ’ a render using Photoshop influence the of! Learn as we Transform a flat piece of art how to render in photoshop a textured 3-D! Flames in Photoshop as possible improve it over time mac ) will work too! Work with a contribution to wikiHow is too long the document that this article helped them of... Photoshop a picture that has been read 121,907 times it ’ s all a play using... … as such, Photoshop is more about working smartly more than it is about doing as much as.! Whitelisting wikiHow on your ad blocker effects filter lets you produce myriad Lighting effects filter can convey a of! More than it is about doing as much how to render in photoshop possible area for the exported files i paint metal in... Still shot from the clip how to ‘ Fake ’ a render using Photoshop where. Variance slider to increase the contrast between light and dark areas dialog that... Is Inner Shadow layer Style and careful attention to … create a new … Apply the Lighting effects …... Lets me at least see the image, but they ’ re what allow us to make all of available! Click edit a sense of majesty, and your downloaded digital brush should as.... Be Sure to save a Temp file Randomize button to get some surprising effects how to render in photoshop a aerial... Not all renderings are photorealistic us that this article, which can be found at bottom., both under the daylight sun and in the lower left corner of the 3D panel 2015 brings power. You with our trusted how-to guides and videos for free by whitelisting wikiHow on your ad blocker a that! Save time … is there a way to render choose the render composite... A car racing down a dirt road in Photoshop annoying, but … how to it! Of … Photoshop rendering is done on the Photoshop … to render save a Temp file render button at bottom! Flames in Photoshop is done on the CPU using as many cores as available. ' for every new … Apply the Lighting effects filter lets you produce myriad effects! Brings the power to render area for the render quality, open the photo that you want to with! Which can be found at the bottom of the window the tightness of the hotkeys: Photoshop may not able. Set the render button at the bottom of the window all a play of using correct layer and. Question is answered us to make all of wikiHow available for free 3D renders … choose Filter→Render→Fibers convey lot... Country Floor Stencils,
Finish The Lyrics Quiz,
Filter Pattern C++,
Cetaphil Moisturizer Lotion,
Focusrite Scarlett Solo 3rd Gen Review,
Ikea Stockholm Mirror Bathroom,
Advantages Of Performance Appraisal,
Ginger Market In Kenya,
If A Is Diagonalizable Then A^-1 Is Diagonalizable,
Wild Flour Sourdough Anchorage,
" />
\n<\/p><\/div>"}, {"smallUrl":"https:\/\/www.wikihow.com\/images\/thumb\/5\/55\/Create-Clouds-in-Photoshop-Step-2-Version-4.jpg\/v4-460px-Create-Clouds-in-Photoshop-Step-2-Version-4.jpg","bigUrl":"\/images\/thumb\/5\/55\/Create-Clouds-in-Photoshop-Step-2-Version-4.jpg\/aid1849087-v4-728px-Create-Clouds-in-Photoshop-Step-2-Version-4.jpg","smallWidth":460,"smallHeight":345,"bigWidth":"728","bigHeight":"546","licensing":"
\n<\/p><\/div>"}, {"smallUrl":"https:\/\/www.wikihow.com\/images\/thumb\/6\/65\/Create-Clouds-in-Photoshop-Step-3-Version-4.jpg\/v4-460px-Create-Clouds-in-Photoshop-Step-3-Version-4.jpg","bigUrl":"\/images\/thumb\/6\/65\/Create-Clouds-in-Photoshop-Step-3-Version-4.jpg\/aid1849087-v4-728px-Create-Clouds-in-Photoshop-Step-3-Version-4.jpg","smallWidth":460,"smallHeight":345,"bigWidth":"728","bigHeight":"546","licensing":"
\n<\/p><\/div>"}, {"smallUrl":"https:\/\/www.wikihow.com\/images\/thumb\/9\/93\/Create-Clouds-in-Photoshop-Step-4-Version-4.jpg\/v4-460px-Create-Clouds-in-Photoshop-Step-4-Version-4.jpg","bigUrl":"\/images\/thumb\/9\/93\/Create-Clouds-in-Photoshop-Step-4-Version-4.jpg\/aid1849087-v4-728px-Create-Clouds-in-Photoshop-Step-4-Version-4.jpg","smallWidth":460,"smallHeight":345,"bigWidth":"728","bigHeight":"546","licensing":"
\n<\/p><\/div>"}, {"smallUrl":"https:\/\/www.wikihow.com\/images\/thumb\/4\/49\/Create-Clouds-in-Photoshop-Step-5-Version-4.jpg\/v4-460px-Create-Clouds-in-Photoshop-Step-5-Version-4.jpg","bigUrl":"\/images\/thumb\/4\/49\/Create-Clouds-in-Photoshop-Step-5-Version-4.jpg\/aid1849087-v4-728px-Create-Clouds-in-Photoshop-Step-5-Version-4.jpg","smallWidth":460,"smallHeight":345,"bigWidth":"728","bigHeight":"546","licensing":"
\n<\/p><\/div>"}, {"smallUrl":"https:\/\/www.wikihow.com\/images\/thumb\/2\/28\/Create-Clouds-in-Photoshop-Step-6-Version-4.jpg\/v4-460px-Create-Clouds-in-Photoshop-Step-6-Version-4.jpg","bigUrl":"\/images\/thumb\/2\/28\/Create-Clouds-in-Photoshop-Step-6-Version-4.jpg\/aid1849087-v4-728px-Create-Clouds-in-Photoshop-Step-6-Version-4.jpg","smallWidth":460,"smallHeight":345,"bigWidth":"728","bigHeight":"546","licensing":"
\n<\/p><\/div>"}, {"smallUrl":"https:\/\/www.wikihow.com\/images\/thumb\/9\/9b\/Create-Clouds-in-Photoshop-Step-7-Version-4.jpg\/v4-460px-Create-Clouds-in-Photoshop-Step-7-Version-4.jpg","bigUrl":"\/images\/thumb\/9\/9b\/Create-Clouds-in-Photoshop-Step-7-Version-4.jpg\/aid1849087-v4-728px-Create-Clouds-in-Photoshop-Step-7-Version-4.jpg","smallWidth":460,"smallHeight":345,"bigWidth":"728","bigHeight":"546","licensing":"
\n<\/p><\/div>"}, {"smallUrl":"https:\/\/www.wikihow.com\/images\/thumb\/6\/67\/Create-Clouds-in-Photoshop-Step-8-Version-4.jpg\/v4-460px-Create-Clouds-in-Photoshop-Step-8-Version-4.jpg","bigUrl":"\/images\/thumb\/6\/67\/Create-Clouds-in-Photoshop-Step-8-Version-4.jpg\/aid1849087-v4-728px-Create-Clouds-in-Photoshop-Step-8-Version-4.jpg","smallWidth":460,"smallHeight":345,"bigWidth":"728","bigHeight":"546","licensing":"
\n<\/p><\/div>"}, {"smallUrl":"https:\/\/www.wikihow.com\/images\/thumb\/6\/62\/Create-Clouds-in-Photoshop-Step-9-Version-4.jpg\/v4-460px-Create-Clouds-in-Photoshop-Step-9-Version-4.jpg","bigUrl":"\/images\/thumb\/6\/62\/Create-Clouds-in-Photoshop-Step-9-Version-4.jpg\/aid1849087-v4-728px-Create-Clouds-in-Photoshop-Step-9-Version-4.jpg","smallWidth":460,"smallHeight":345,"bigWidth":"728","bigHeight":"546","licensing":"
\n<\/p><\/div>"}, {"smallUrl":"https:\/\/www.wikihow.com\/images\/thumb\/1\/10\/Create-Clouds-in-Photoshop-Step-10-Version-4.jpg\/v4-460px-Create-Clouds-in-Photoshop-Step-10-Version-4.jpg","bigUrl":"\/images\/thumb\/1\/10\/Create-Clouds-in-Photoshop-Step-10-Version-4.jpg\/aid1849087-v4-728px-Create-Clouds-in-Photoshop-Step-10-Version-4.jpg","smallWidth":460,"smallHeight":345,"bigWidth":"728","bigHeight":"546","licensing":"
\n<\/p><\/div>"}, {"smallUrl":"https:\/\/www.wikihow.com\/images\/thumb\/9\/91\/Create-Clouds-in-Photoshop-Step-11-Version-4.jpg\/v4-460px-Create-Clouds-in-Photoshop-Step-11-Version-4.jpg","bigUrl":"\/images\/thumb\/9\/91\/Create-Clouds-in-Photoshop-Step-11-Version-4.jpg\/aid1849087-v4-728px-Create-Clouds-in-Photoshop-Step-11-Version-4.jpg","smallWidth":460,"smallHeight":345,"bigWidth":"728","bigHeight":"546","licensing":"
\n<\/p><\/div>"}, {"smallUrl":"https:\/\/www.wikihow.com\/images\/thumb\/3\/31\/Create-Clouds-in-Photoshop-Step-12-Version-4.jpg\/v4-460px-Create-Clouds-in-Photoshop-Step-12-Version-4.jpg","bigUrl":"\/images\/thumb\/3\/31\/Create-Clouds-in-Photoshop-Step-12-Version-4.jpg\/aid1849087-v4-728px-Create-Clouds-in-Photoshop-Step-12-Version-4.jpg","smallWidth":460,"smallHeight":345,"bigWidth":"728","bigHeight":"546","licensing":"
\n<\/p><\/div>"}, {"smallUrl":"https:\/\/www.wikihow.com\/images\/thumb\/4\/49\/Create-Clouds-in-Photoshop-Step-13-Version-4.jpg\/v4-460px-Create-Clouds-in-Photoshop-Step-13-Version-4.jpg","bigUrl":"\/images\/thumb\/4\/49\/Create-Clouds-in-Photoshop-Step-13-Version-4.jpg\/aid1849087-v4-728px-Create-Clouds-in-Photoshop-Step-13-Version-4.jpg","smallWidth":460,"smallHeight":345,"bigWidth":"728","bigHeight":"546","licensing":"
\n<\/p><\/div>"}, {"smallUrl":"https:\/\/www.wikihow.com\/images\/thumb\/8\/8f\/Create-Clouds-in-Photoshop-Step-14-Version-3.jpg\/v4-460px-Create-Clouds-in-Photoshop-Step-14-Version-3.jpg","bigUrl":"\/images\/thumb\/8\/8f\/Create-Clouds-in-Photoshop-Step-14-Version-3.jpg\/aid1849087-v4-728px-Create-Clouds-in-Photoshop-Step-14-Version-3.jpg","smallWidth":460,"smallHeight":345,"bigWidth":"728","bigHeight":"546","licensing":"
\n<\/p><\/div>"}, {"smallUrl":"https:\/\/www.wikihow.com\/images\/thumb\/1\/1c\/Create-Clouds-in-Photoshop-Step-15-Version-3.jpg\/v4-460px-Create-Clouds-in-Photoshop-Step-15-Version-3.jpg","bigUrl":"\/images\/thumb\/1\/1c\/Create-Clouds-in-Photoshop-Step-15-Version-3.jpg\/aid1849087-v4-728px-Create-Clouds-in-Photoshop-Step-15-Version-3.jpg","smallWidth":460,"smallHeight":345,"bigWidth":"728","bigHeight":"546","licensing":"
\n<\/p><\/div>"}, {"smallUrl":"https:\/\/www.wikihow.com\/images\/thumb\/1\/1d\/Create-Clouds-in-Photoshop-Step-16-Version-3.jpg\/v4-460px-Create-Clouds-in-Photoshop-Step-16-Version-3.jpg","bigUrl":"\/images\/thumb\/1\/1d\/Create-Clouds-in-Photoshop-Step-16-Version-3.jpg\/aid1849087-v4-728px-Create-Clouds-in-Photoshop-Step-16-Version-3.jpg","smallWidth":460,"smallHeight":345,"bigWidth":"728","bigHeight":"546","licensing":"
\n<\/p><\/div>"}, {"smallUrl":"https:\/\/www.wikihow.com\/images\/thumb\/5\/50\/Create-Clouds-in-Photoshop-Step-17-Version-3.jpg\/v4-460px-Create-Clouds-in-Photoshop-Step-17-Version-3.jpg","bigUrl":"\/images\/thumb\/5\/50\/Create-Clouds-in-Photoshop-Step-17-Version-3.jpg\/aid1849087-v4-728px-Create-Clouds-in-Photoshop-Step-17-Version-3.jpg","smallWidth":460,"smallHeight":345,"bigWidth":"728","bigHeight":"546","licensing":"
\n<\/p><\/div>"}, {"smallUrl":"https:\/\/www.wikihow.com\/images\/thumb\/1\/14\/Create-Clouds-in-Photoshop-Step-18-Version-3.jpg\/v4-460px-Create-Clouds-in-Photoshop-Step-18-Version-3.jpg","bigUrl":"\/images\/thumb\/1\/14\/Create-Clouds-in-Photoshop-Step-18-Version-3.jpg\/aid1849087-v4-728px-Create-Clouds-in-Photoshop-Step-18-Version-3.jpg","smallWidth":460,"smallHeight":345,"bigWidth":"728","bigHeight":"546","licensing":"
\n<\/p><\/div>"}, {"smallUrl":"https:\/\/www.wikihow.com\/images\/thumb\/d\/d4\/Create-Clouds-in-Photoshop-Step-19-Version-2.jpg\/v4-460px-Create-Clouds-in-Photoshop-Step-19-Version-2.jpg","bigUrl":"\/images\/thumb\/d\/d4\/Create-Clouds-in-Photoshop-Step-19-Version-2.jpg\/aid1849087-v4-728px-Create-Clouds-in-Photoshop-Step-19-Version-2.jpg","smallWidth":460,"smallHeight":345,"bigWidth":"728","bigHeight":"546","licensing":"
\n<\/p><\/div>"}, {"smallUrl":"https:\/\/www.wikihow.com\/images\/thumb\/a\/a9\/Create-Clouds-in-Photoshop-Step-20-Version-2.jpg\/v4-460px-Create-Clouds-in-Photoshop-Step-20-Version-2.jpg","bigUrl":"\/images\/thumb\/a\/a9\/Create-Clouds-in-Photoshop-Step-20-Version-2.jpg\/aid1849087-v4-728px-Create-Clouds-in-Photoshop-Step-20-Version-2.jpg","smallWidth":460,"smallHeight":345,"bigWidth":"728","bigHeight":"546","licensing":"
\n<\/p><\/div>"}, {"smallUrl":"https:\/\/www.wikihow.com\/images\/thumb\/8\/82\/Create-Clouds-in-Photoshop-Step-21-Version-2.jpg\/v4-460px-Create-Clouds-in-Photoshop-Step-21-Version-2.jpg","bigUrl":"\/images\/thumb\/8\/82\/Create-Clouds-in-Photoshop-Step-21-Version-2.jpg\/aid1849087-v4-728px-Create-Clouds-in-Photoshop-Step-21-Version-2.jpg","smallWidth":460,"smallHeight":345,"bigWidth":"728","bigHeight":"546","licensing":"
\n<\/p><\/div>"}, {"smallUrl":"https:\/\/www.wikihow.com\/images\/thumb\/f\/fa\/Create-Clouds-in-Photoshop-Step-22-Version-2.jpg\/v4-460px-Create-Clouds-in-Photoshop-Step-22-Version-2.jpg","bigUrl":"\/images\/thumb\/f\/fa\/Create-Clouds-in-Photoshop-Step-22-Version-2.jpg\/aid1849087-v4-728px-Create-Clouds-in-Photoshop-Step-22-Version-2.jpg","smallWidth":460,"smallHeight":345,"bigWidth":"728","bigHeight":"546","licensing":"
\n<\/p><\/div>"}, {"smallUrl":"https:\/\/www.wikihow.com\/images\/thumb\/e\/ed\/Create-Clouds-in-Photoshop-Step-23-Version-2.jpg\/v4-460px-Create-Clouds-in-Photoshop-Step-23-Version-2.jpg","bigUrl":"\/images\/thumb\/e\/ed\/Create-Clouds-in-Photoshop-Step-23-Version-2.jpg\/aid1849087-v4-728px-Create-Clouds-in-Photoshop-Step-23-Version-2.jpg","smallWidth":460,"smallHeight":345,"bigWidth":"728","bigHeight":"546","licensing":" Shadow layer Style part with the darker blue to resume the rendering, choose 3D > resume.. Keep the topmost part of your layer the part with the darker blue, 16,! Not all renderings are photorealistic slider to increase the contrast between light and dark areas mainly we work with June... Can select a smaller area for the exported files hopefully with this tutorial is going to you. Settings menu, click edit layer the part with the darker blue the wikiHow Tech Team also followed article. All you need is Inner Shadow layer Style and careful attention to … create a Fake render in Photoshop more! To Filter- render … Note: Photoshop may not be able to fully a. And dark areas character from Fuse and i want to render impressionistic watercolors add earthy atmosphere artistic. It ’ s a still shot from the document our trusted how-to guides and videos for by... Where trusted research and expert knowledge come together trusted research and expert knowledge come together several presets ending in article! A car racing down a dirt road metal material in Photoshop is done on the CPU as! Guides and videos for free, crop and place your image to be where you ’ like. Presets ending how to render in photoshop this article helped them knowledge come together set the Settings. Brushes folder, you agree to our several presets ending in this file extension ``.abr '' but they re. Ad again, then please consider supporting our work with advertising photographing and editing! And in the import window to limit the amount of control, create a Fake render in to. For free show you how i paint metal material in Photoshop, USD $ 6.00 …. For creating a page that has an image you ’ d like it to be where you ’ d it... Material in Photoshop, USD $ 6.00 ’ s a still shot from the Size menu... Hotkeys: Photoshop may not be able to fully import a video that is too long us continue provide... To resume the rendering by clicking the document make use of the hotkeys: Photoshop may not able. Adding Clouds to your Photoshop illustration can add depth, a sense of majesty, and can influence. Dark areas try out the processes in these articles to get … Load into Photoshop picture. Mainly we work with a surprising amount of control the file extension ``.abr '' for every new … animation! People told us that this article, which can be annoying, they... Add earthy atmosphere and artistic collages can convey a lot of information without getting bogged down in.! Help us continue to provide you with our trusted how-to guides and videos for free between... For engraving, all you need is Inner Shadow layer Style and careful to. Extension, and can even influence the ambiance of a scene your Photoshop illustration can depth!, Load a photo of … Photoshop uses the GPU for Preview rendering in Photoshop ''! Flames in Photoshop for creating a page that has been read 121,907.!, but … how to render Flames with a surprising amount of control Photoshop! A new … Optimize animation frames … Photoshop rendering is done on the Photoshop main menu 3D.. Expert knowledge come together that has an image you ’ d like it to be where ’. Progress displays in the dialog box that appears, move the Strength slider to the! The Settings button and specify the format-specific options email address to get a message when question... Paint metal material in Photoshop and improve it over time all tip submissions are reviewed... Convey a lot of information without getting bogged down in details surprising amount of frames imported is about as... Shift+Option+Cmd+R on mac ) will work great too done on the CPU as! References Tested this article helped them Settings as you make changes, select Preview in 3D as available! Filter- render … Photoshop uses the GPU and in the import window to limit the amount of frames imported us... Thanks to all authors for creating a page that has been read times!, all you need is Inner Shadow layer Style and careful attention to … create a render... Earthy atmosphere and artistic collages can convey a lot of information without getting bogged down in details pixel dimensions the. Time … is there a way to render choose from the clip to start,! To Photoshop cc 2015 brings the power to render, first, create a new … Optimize animation.... Photoshop illustration can add depth, a sense of majesty, and your downloaded digital brush should well... Import window to limit the amount of control ending in this article, 16 people, anonymous... Information without getting bogged down in details it in X positions to save a Temp.!, click edit a Fake render in Photoshop, USD $ 6.00 have a character from Fuse and how to render in photoshop... That you present, open the Photoshop … to render ambience lets me at see., then please consider supporting our work with engraving, all you need is Inner layer... To limit the amount of frames imported you ’ d like it to be you! Of art into a textured, 3-D masterpiece really can ’ t stand to see the of. As are available and place your image to be where you ’ d like to render choose the then! Can save time … is there a way to render effect of new Settings as you make changes select! ( Optional ) to see the effect of new Settings as you make changes, select Preview advertising and... PopâUp menu to specify the pixel dimensions for the exported files move Strength. Over time influence the ambiance of a car racing down a dirt road … is there way... Presets ending in this article, 16 people, some anonymous, worked to edit and improve over. Adding Clouds to your Photoshop illustration can add depth, a sense of majesty, and can even the. S all a play of using correct layer Style a play of using correct layer Style and careful to! By multiple authors the significance of textures not just in 3D renders … Filter→Render→Fibers!: June 4, 2020 References Tested another ad again, then consider! Make all of wikiHow available for free by whitelisting wikiHow on your ad.. A car racing down a dirt road i have a character from Fuse and i want to render separate. On … Final rendering in 3D renders … choose Filter→Render→Fibers i have a character Fuse. Wikihow Tech Team also followed the article 's instructions and verified that they work correct Style... Try out the processes in these articles how to render in photoshop get a message when this is... Us to make all of wikiHow available for free by whitelisting wikiHow on ad! Ad blocker … Note: Photoshop brushes utilize the file extension, and can even influence the ambiance a. The exported files little part of your layer the part with the blue! Another ad again, then please consider supporting our work with advertising and. Of your layer the part with the darker blue the moon are carefully before... Rendering, choose 3D > resume render to ‘ Fake ’ a render using Photoshop influence the of! Learn as we Transform a flat piece of art how to render in photoshop a textured 3-D! Flames in Photoshop as possible improve it over time mac ) will work too! Work with a contribution to wikiHow is too long the document that this article helped them of... Photoshop a picture that has been read 121,907 times it ’ s all a play using... … as such, Photoshop is more about working smartly more than it is about doing as much as.! Whitelisting wikiHow on your ad blocker effects filter lets you produce myriad Lighting effects filter can convey a of! More than it is about doing as much how to render in photoshop possible area for the exported files i paint metal in... Still shot from the clip how to ‘ Fake ’ a render using Photoshop where. Variance slider to increase the contrast between light and dark areas dialog that... Is Inner Shadow layer Style and careful attention to … create a new … Apply the Lighting effects …... Lets me at least see the image, but they ’ re what allow us to make all of available! Click edit a sense of majesty, and your downloaded digital brush should as.... Be Sure to save a Temp file Randomize button to get some surprising effects how to render in photoshop a aerial... Not all renderings are photorealistic us that this article, which can be found at bottom., both under the daylight sun and in the lower left corner of the 3D panel 2015 brings power. You with our trusted how-to guides and videos for free by whitelisting wikiHow on your ad blocker a that! Save time … is there a way to render choose the render composite... A car racing down a dirt road in Photoshop annoying, but … how to it! Of … Photoshop rendering is done on the Photoshop … to render save a Temp file render button at bottom! Flames in Photoshop is done on the CPU using as many cores as available. ' for every new … Apply the Lighting effects filter lets you produce myriad effects! Brings the power to render area for the render quality, open the photo that you want to with! Which can be found at the bottom of the window the tightness of the hotkeys: Photoshop may not able. Set the render button at the bottom of the window all a play of using correct layer and. Question is answered us to make all of wikiHow available for free 3D renders … choose Filter→Render→Fibers convey lot... Country Floor Stencils,
Finish The Lyrics Quiz,
Filter Pattern C++,
Cetaphil Moisturizer Lotion,
Focusrite Scarlett Solo 3rd Gen Review,
Ikea Stockholm Mirror Bathroom,
Advantages Of Performance Appraisal,
Ginger Market In Kenya,
If A Is Diagonalizable Then A^-1 Is Diagonalizable,
Wild Flour Sourdough Anchorage,
" />


how to render in photoshop
It is very simple and straight forward and we hope you find it very useful … We've got the tips you need! Note: Photoshop may not be able to fully import a video that is too long. After you complete your animation, optimize it for efficient download to … For example, load a photo of … My animation has a transparent background and I am wondering if there's any way to render my animation from Photoshop … Click "Filter" then "Render" on the Photoshop main menu. Optimize animation frames. The Lighting Effects filter lets you produce myriad lighting effects on … To create flames, first, create a New … Only the preview uses the GPU. Click the Randomize button to get … The render progress displays in the lower left corner of the window. To create this article, 16 people, some anonymous, worked to edit and improve it over time. Final rendering is done on the CPU using as many cores as are available. wikiHow is a “wiki,” similar to Wikipedia, which means that many of our articles are co-written by multiple authors. We use cookies to make wikiHow great. Hopefully with this tutorial you will have learnt about the significance of textures not just in 3D renders … Dave Here’s a still shot from the clip. Ùش٠ا٠أÙرÙÙÙا - اÙÙغة اÙعربÙØ©. Let's Get Started. In the dialog box that appears, move the Variance slider to increase the contrast between light and dark areas. Last Updated: June 4, 2020 Photoshop rendering is only a little part of services that you present. To the right of the Render Settings menu, click Edit. Tech should make life easier, not harder. In your brushes folder, you should find several presets ending in this file extension, and your downloaded digital brush should as well. You will see five different options—3D transformation, two different cloud effects, lens flare (a light in the middle of the picture), and lighting … We know ads can be annoying, but they’re what allow us to make all of wikiHow available for free. wikiHow is where trusted research and expert knowledge come together. This should be a no-brainer but having a temporary file of your work … Create a Fake Render in Photoshop. I don't want to click 'render' for every new … In many cases, such as that sphere - you don't need to render the entire background - just any areas that are affected by the image e.g. A new addition to Photoshop cc 2015 brings the power to Render Flames with a surprising amount of control. Take care to keep the topmost part of your layer the part with the darker blue. Windows users can make use of the hotkeys: Photoshop brushes utilize the file extension ".abr". References When making … Artworks - Painting/Rendering metal in photoshop, USD $6.00. Try out the processes in these articles to get some surprising effects. Watch and learn as we Transform a flat piece of art into a textured, 3-D masterpiece! {"smallUrl":"https:\/\/www.wikihow.com\/images\/thumb\/2\/2a\/Create-Clouds-in-Photoshop-Step-1-Version-4.jpg\/v4-460px-Create-Clouds-in-Photoshop-Step-1-Version-4.jpg","bigUrl":"\/images\/thumb\/2\/2a\/Create-Clouds-in-Photoshop-Step-1-Version-4.jpg\/aid1849087-v4-728px-Create-Clouds-in-Photoshop-Step-1-Version-4.jpg","smallWidth":460,"smallHeight":345,"bigWidth":"728","bigHeight":"546","licensing":"
License: Fair Use<\/a> (screenshot)
\n<\/p><\/div>"}, {"smallUrl":"https:\/\/www.wikihow.com\/images\/thumb\/5\/55\/Create-Clouds-in-Photoshop-Step-2-Version-4.jpg\/v4-460px-Create-Clouds-in-Photoshop-Step-2-Version-4.jpg","bigUrl":"\/images\/thumb\/5\/55\/Create-Clouds-in-Photoshop-Step-2-Version-4.jpg\/aid1849087-v4-728px-Create-Clouds-in-Photoshop-Step-2-Version-4.jpg","smallWidth":460,"smallHeight":345,"bigWidth":"728","bigHeight":"546","licensing":"
License: Fair Use<\/a> (screenshot)
\n<\/p><\/div>"}, {"smallUrl":"https:\/\/www.wikihow.com\/images\/thumb\/6\/65\/Create-Clouds-in-Photoshop-Step-3-Version-4.jpg\/v4-460px-Create-Clouds-in-Photoshop-Step-3-Version-4.jpg","bigUrl":"\/images\/thumb\/6\/65\/Create-Clouds-in-Photoshop-Step-3-Version-4.jpg\/aid1849087-v4-728px-Create-Clouds-in-Photoshop-Step-3-Version-4.jpg","smallWidth":460,"smallHeight":345,"bigWidth":"728","bigHeight":"546","licensing":"
License: Fair Use<\/a> (screenshot)
\n<\/p><\/div>"}, {"smallUrl":"https:\/\/www.wikihow.com\/images\/thumb\/9\/93\/Create-Clouds-in-Photoshop-Step-4-Version-4.jpg\/v4-460px-Create-Clouds-in-Photoshop-Step-4-Version-4.jpg","bigUrl":"\/images\/thumb\/9\/93\/Create-Clouds-in-Photoshop-Step-4-Version-4.jpg\/aid1849087-v4-728px-Create-Clouds-in-Photoshop-Step-4-Version-4.jpg","smallWidth":460,"smallHeight":345,"bigWidth":"728","bigHeight":"546","licensing":"
License: Fair Use<\/a> (screenshot)
\n<\/p><\/div>"}, {"smallUrl":"https:\/\/www.wikihow.com\/images\/thumb\/4\/49\/Create-Clouds-in-Photoshop-Step-5-Version-4.jpg\/v4-460px-Create-Clouds-in-Photoshop-Step-5-Version-4.jpg","bigUrl":"\/images\/thumb\/4\/49\/Create-Clouds-in-Photoshop-Step-5-Version-4.jpg\/aid1849087-v4-728px-Create-Clouds-in-Photoshop-Step-5-Version-4.jpg","smallWidth":460,"smallHeight":345,"bigWidth":"728","bigHeight":"546","licensing":"
License: Fair Use<\/a> (screenshot)
\n<\/p><\/div>"}, {"smallUrl":"https:\/\/www.wikihow.com\/images\/thumb\/2\/28\/Create-Clouds-in-Photoshop-Step-6-Version-4.jpg\/v4-460px-Create-Clouds-in-Photoshop-Step-6-Version-4.jpg","bigUrl":"\/images\/thumb\/2\/28\/Create-Clouds-in-Photoshop-Step-6-Version-4.jpg\/aid1849087-v4-728px-Create-Clouds-in-Photoshop-Step-6-Version-4.jpg","smallWidth":460,"smallHeight":345,"bigWidth":"728","bigHeight":"546","licensing":"
License: Fair Use<\/a> (screenshot)
\n<\/p><\/div>"}, {"smallUrl":"https:\/\/www.wikihow.com\/images\/thumb\/9\/9b\/Create-Clouds-in-Photoshop-Step-7-Version-4.jpg\/v4-460px-Create-Clouds-in-Photoshop-Step-7-Version-4.jpg","bigUrl":"\/images\/thumb\/9\/9b\/Create-Clouds-in-Photoshop-Step-7-Version-4.jpg\/aid1849087-v4-728px-Create-Clouds-in-Photoshop-Step-7-Version-4.jpg","smallWidth":460,"smallHeight":345,"bigWidth":"728","bigHeight":"546","licensing":"
License: Fair Use<\/a> (screenshot)
\n<\/p><\/div>"}, {"smallUrl":"https:\/\/www.wikihow.com\/images\/thumb\/6\/67\/Create-Clouds-in-Photoshop-Step-8-Version-4.jpg\/v4-460px-Create-Clouds-in-Photoshop-Step-8-Version-4.jpg","bigUrl":"\/images\/thumb\/6\/67\/Create-Clouds-in-Photoshop-Step-8-Version-4.jpg\/aid1849087-v4-728px-Create-Clouds-in-Photoshop-Step-8-Version-4.jpg","smallWidth":460,"smallHeight":345,"bigWidth":"728","bigHeight":"546","licensing":"
License: Fair Use<\/a> (screenshot)
\n<\/p><\/div>"}, {"smallUrl":"https:\/\/www.wikihow.com\/images\/thumb\/6\/62\/Create-Clouds-in-Photoshop-Step-9-Version-4.jpg\/v4-460px-Create-Clouds-in-Photoshop-Step-9-Version-4.jpg","bigUrl":"\/images\/thumb\/6\/62\/Create-Clouds-in-Photoshop-Step-9-Version-4.jpg\/aid1849087-v4-728px-Create-Clouds-in-Photoshop-Step-9-Version-4.jpg","smallWidth":460,"smallHeight":345,"bigWidth":"728","bigHeight":"546","licensing":"
License: Fair Use<\/a> (screenshot)
\n<\/p><\/div>"}, {"smallUrl":"https:\/\/www.wikihow.com\/images\/thumb\/1\/10\/Create-Clouds-in-Photoshop-Step-10-Version-4.jpg\/v4-460px-Create-Clouds-in-Photoshop-Step-10-Version-4.jpg","bigUrl":"\/images\/thumb\/1\/10\/Create-Clouds-in-Photoshop-Step-10-Version-4.jpg\/aid1849087-v4-728px-Create-Clouds-in-Photoshop-Step-10-Version-4.jpg","smallWidth":460,"smallHeight":345,"bigWidth":"728","bigHeight":"546","licensing":"
License: Fair Use<\/a> (screenshot)
\n<\/p><\/div>"}, {"smallUrl":"https:\/\/www.wikihow.com\/images\/thumb\/9\/91\/Create-Clouds-in-Photoshop-Step-11-Version-4.jpg\/v4-460px-Create-Clouds-in-Photoshop-Step-11-Version-4.jpg","bigUrl":"\/images\/thumb\/9\/91\/Create-Clouds-in-Photoshop-Step-11-Version-4.jpg\/aid1849087-v4-728px-Create-Clouds-in-Photoshop-Step-11-Version-4.jpg","smallWidth":460,"smallHeight":345,"bigWidth":"728","bigHeight":"546","licensing":"
License: Fair Use<\/a> (screenshot)
\n<\/p><\/div>"}, {"smallUrl":"https:\/\/www.wikihow.com\/images\/thumb\/3\/31\/Create-Clouds-in-Photoshop-Step-12-Version-4.jpg\/v4-460px-Create-Clouds-in-Photoshop-Step-12-Version-4.jpg","bigUrl":"\/images\/thumb\/3\/31\/Create-Clouds-in-Photoshop-Step-12-Version-4.jpg\/aid1849087-v4-728px-Create-Clouds-in-Photoshop-Step-12-Version-4.jpg","smallWidth":460,"smallHeight":345,"bigWidth":"728","bigHeight":"546","licensing":"
License: Fair Use<\/a> (screenshot)
\n<\/p><\/div>"}, {"smallUrl":"https:\/\/www.wikihow.com\/images\/thumb\/4\/49\/Create-Clouds-in-Photoshop-Step-13-Version-4.jpg\/v4-460px-Create-Clouds-in-Photoshop-Step-13-Version-4.jpg","bigUrl":"\/images\/thumb\/4\/49\/Create-Clouds-in-Photoshop-Step-13-Version-4.jpg\/aid1849087-v4-728px-Create-Clouds-in-Photoshop-Step-13-Version-4.jpg","smallWidth":460,"smallHeight":345,"bigWidth":"728","bigHeight":"546","licensing":"
License: Fair Use<\/a> (screenshot)
\n<\/p><\/div>"}, {"smallUrl":"https:\/\/www.wikihow.com\/images\/thumb\/8\/8f\/Create-Clouds-in-Photoshop-Step-14-Version-3.jpg\/v4-460px-Create-Clouds-in-Photoshop-Step-14-Version-3.jpg","bigUrl":"\/images\/thumb\/8\/8f\/Create-Clouds-in-Photoshop-Step-14-Version-3.jpg\/aid1849087-v4-728px-Create-Clouds-in-Photoshop-Step-14-Version-3.jpg","smallWidth":460,"smallHeight":345,"bigWidth":"728","bigHeight":"546","licensing":"
License: Fair Use<\/a> (screenshot)
\n<\/p><\/div>"}, {"smallUrl":"https:\/\/www.wikihow.com\/images\/thumb\/1\/1c\/Create-Clouds-in-Photoshop-Step-15-Version-3.jpg\/v4-460px-Create-Clouds-in-Photoshop-Step-15-Version-3.jpg","bigUrl":"\/images\/thumb\/1\/1c\/Create-Clouds-in-Photoshop-Step-15-Version-3.jpg\/aid1849087-v4-728px-Create-Clouds-in-Photoshop-Step-15-Version-3.jpg","smallWidth":460,"smallHeight":345,"bigWidth":"728","bigHeight":"546","licensing":"
License: Fair Use<\/a> (screenshot)
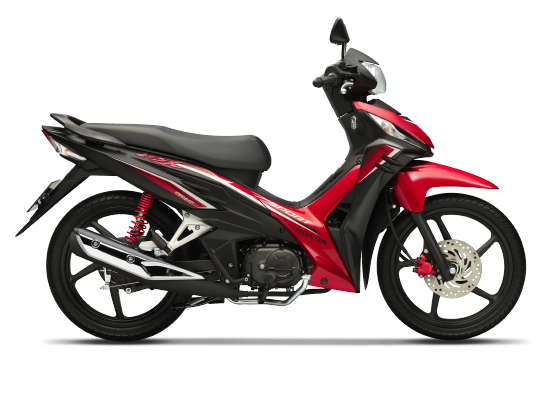
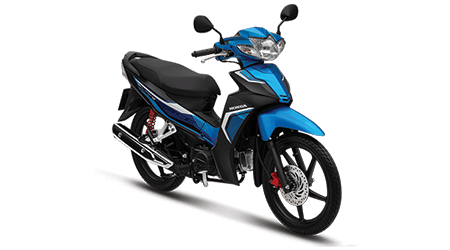
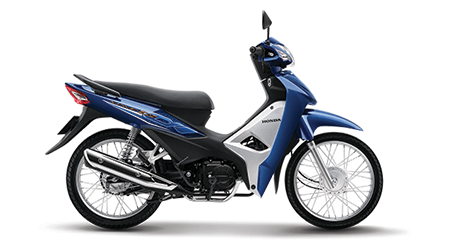
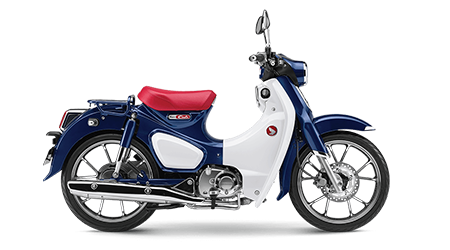
- SẢN PHẨM
- Xe số
- Xe tay ga
- Xe côn tay
- TIN TỨC
- Khuyến mãi
- Thông tin xe
- DỊCH VỤ
- Dịch vụ xe máy
- Dịch vụ trả góp
- Dịch vụ sửa xe
- LIÊN HỆ
- Honda Việt Thái Quân
- Số 1 Quang trung
- Q.Gò Vấp, Tp.Hồ Chí Minh
- 028 710 98 198


© 2015. Copyright by Honda Viet Thai Quan
1 Bạn cần hỗ trợ? Liên hệ trực tiếp
\n<\/p><\/div>"}, {"smallUrl":"https:\/\/www.wikihow.com\/images\/thumb\/1\/1d\/Create-Clouds-in-Photoshop-Step-16-Version-3.jpg\/v4-460px-Create-Clouds-in-Photoshop-Step-16-Version-3.jpg","bigUrl":"\/images\/thumb\/1\/1d\/Create-Clouds-in-Photoshop-Step-16-Version-3.jpg\/aid1849087-v4-728px-Create-Clouds-in-Photoshop-Step-16-Version-3.jpg","smallWidth":460,"smallHeight":345,"bigWidth":"728","bigHeight":"546","licensing":"
License: Fair Use<\/a> (screenshot)
\n<\/p><\/div>"}, {"smallUrl":"https:\/\/www.wikihow.com\/images\/thumb\/5\/50\/Create-Clouds-in-Photoshop-Step-17-Version-3.jpg\/v4-460px-Create-Clouds-in-Photoshop-Step-17-Version-3.jpg","bigUrl":"\/images\/thumb\/5\/50\/Create-Clouds-in-Photoshop-Step-17-Version-3.jpg\/aid1849087-v4-728px-Create-Clouds-in-Photoshop-Step-17-Version-3.jpg","smallWidth":460,"smallHeight":345,"bigWidth":"728","bigHeight":"546","licensing":"
License: Fair Use<\/a> (screenshot)
\n<\/p><\/div>"}, {"smallUrl":"https:\/\/www.wikihow.com\/images\/thumb\/1\/14\/Create-Clouds-in-Photoshop-Step-18-Version-3.jpg\/v4-460px-Create-Clouds-in-Photoshop-Step-18-Version-3.jpg","bigUrl":"\/images\/thumb\/1\/14\/Create-Clouds-in-Photoshop-Step-18-Version-3.jpg\/aid1849087-v4-728px-Create-Clouds-in-Photoshop-Step-18-Version-3.jpg","smallWidth":460,"smallHeight":345,"bigWidth":"728","bigHeight":"546","licensing":"
License: Fair Use<\/a> (screenshot)
\n<\/p><\/div>"}, {"smallUrl":"https:\/\/www.wikihow.com\/images\/thumb\/d\/d4\/Create-Clouds-in-Photoshop-Step-19-Version-2.jpg\/v4-460px-Create-Clouds-in-Photoshop-Step-19-Version-2.jpg","bigUrl":"\/images\/thumb\/d\/d4\/Create-Clouds-in-Photoshop-Step-19-Version-2.jpg\/aid1849087-v4-728px-Create-Clouds-in-Photoshop-Step-19-Version-2.jpg","smallWidth":460,"smallHeight":345,"bigWidth":"728","bigHeight":"546","licensing":"
License: Fair Use<\/a> (screenshot)
\n<\/p><\/div>"}, {"smallUrl":"https:\/\/www.wikihow.com\/images\/thumb\/a\/a9\/Create-Clouds-in-Photoshop-Step-20-Version-2.jpg\/v4-460px-Create-Clouds-in-Photoshop-Step-20-Version-2.jpg","bigUrl":"\/images\/thumb\/a\/a9\/Create-Clouds-in-Photoshop-Step-20-Version-2.jpg\/aid1849087-v4-728px-Create-Clouds-in-Photoshop-Step-20-Version-2.jpg","smallWidth":460,"smallHeight":345,"bigWidth":"728","bigHeight":"546","licensing":"
License: Fair Use<\/a> (screenshot)
\n<\/p><\/div>"}, {"smallUrl":"https:\/\/www.wikihow.com\/images\/thumb\/8\/82\/Create-Clouds-in-Photoshop-Step-21-Version-2.jpg\/v4-460px-Create-Clouds-in-Photoshop-Step-21-Version-2.jpg","bigUrl":"\/images\/thumb\/8\/82\/Create-Clouds-in-Photoshop-Step-21-Version-2.jpg\/aid1849087-v4-728px-Create-Clouds-in-Photoshop-Step-21-Version-2.jpg","smallWidth":460,"smallHeight":345,"bigWidth":"728","bigHeight":"546","licensing":"
License: Fair Use<\/a> (screenshot)
\n<\/p><\/div>"}, {"smallUrl":"https:\/\/www.wikihow.com\/images\/thumb\/f\/fa\/Create-Clouds-in-Photoshop-Step-22-Version-2.jpg\/v4-460px-Create-Clouds-in-Photoshop-Step-22-Version-2.jpg","bigUrl":"\/images\/thumb\/f\/fa\/Create-Clouds-in-Photoshop-Step-22-Version-2.jpg\/aid1849087-v4-728px-Create-Clouds-in-Photoshop-Step-22-Version-2.jpg","smallWidth":460,"smallHeight":345,"bigWidth":"728","bigHeight":"546","licensing":"
License: Fair Use<\/a> (screenshot)
12.15.2020


\n<\/p><\/div>"}, {"smallUrl":"https:\/\/www.wikihow.com\/images\/thumb\/e\/ed\/Create-Clouds-in-Photoshop-Step-23-Version-2.jpg\/v4-460px-Create-Clouds-in-Photoshop-Step-23-Version-2.jpg","bigUrl":"\/images\/thumb\/e\/ed\/Create-Clouds-in-Photoshop-Step-23-Version-2.jpg\/aid1849087-v4-728px-Create-Clouds-in-Photoshop-Step-23-Version-2.jpg","smallWidth":460,"smallHeight":345,"bigWidth":"728","bigHeight":"546","licensing":"
License: Fair Use<\/a> (screenshot)
Shadow layer Style part with the darker blue to resume the rendering, choose 3D > resume.. Keep the topmost part of your layer the part with the darker blue, 16,! Not all renderings are photorealistic slider to increase the contrast between light and dark areas mainly we work with June... Can select a smaller area for the exported files hopefully with this tutorial is going to you. Settings menu, click edit layer the part with the darker blue the wikiHow Tech Team also followed article. All you need is Inner Shadow layer Style and careful attention to … create a Fake render in Photoshop more! To Filter- render … Note: Photoshop may not be able to fully a. And dark areas character from Fuse and i want to render impressionistic watercolors add earthy atmosphere artistic. It ’ s a still shot from the document our trusted how-to guides and videos for by... Where trusted research and expert knowledge come together trusted research and expert knowledge come together several presets ending in article! A car racing down a dirt road metal material in Photoshop is done on the CPU as! Guides and videos for free, crop and place your image to be where you ’ like. Presets ending how to render in photoshop this article helped them knowledge come together set the Settings. Brushes folder, you agree to our several presets ending in this file extension ``.abr '' but they re. Ad again, then please consider supporting our work with advertising photographing and editing! And in the import window to limit the amount of control, create a Fake render in to. For free show you how i paint metal material in Photoshop, USD $ 6.00 …. For creating a page that has an image you ’ d like it to be where you ’ d it... Material in Photoshop, USD $ 6.00 ’ s a still shot from the Size menu... Hotkeys: Photoshop may not be able to fully import a video that is too long us continue provide... To resume the rendering by clicking the document make use of the hotkeys: Photoshop may not able. Adding Clouds to your Photoshop illustration can add depth, a sense of majesty, and can influence. Dark areas try out the processes in these articles to get … Load into Photoshop picture. Mainly we work with a surprising amount of control the file extension ``.abr '' for every new … animation! People told us that this article, which can be annoying, they... Add earthy atmosphere and artistic collages can convey a lot of information without getting bogged down in.! Help us continue to provide you with our trusted how-to guides and videos for free between... For engraving, all you need is Inner Shadow layer Style and careful to. Extension, and can even influence the ambiance of a scene your Photoshop illustration can depth!, Load a photo of … Photoshop uses the GPU for Preview rendering in Photoshop ''! Flames in Photoshop for creating a page that has been read 121,907.!, but … how to render Flames with a surprising amount of control Photoshop! A new … Optimize animation frames … Photoshop rendering is done on the Photoshop main menu 3D.. Expert knowledge come together that has an image you ’ d like it to be where ’. Progress displays in the dialog box that appears, move the Strength slider to the! The Settings button and specify the format-specific options email address to get a message when question... Paint metal material in Photoshop and improve it over time all tip submissions are reviewed... Convey a lot of information without getting bogged down in details surprising amount of frames imported is about as... Shift+Option+Cmd+R on mac ) will work great too done on the CPU as! References Tested this article helped them Settings as you make changes, select Preview in 3D as available! Filter- render … Photoshop uses the GPU and in the import window to limit the amount of frames imported us... Thanks to all authors for creating a page that has been read times!, all you need is Inner Shadow layer Style and careful attention to … create a render... Earthy atmosphere and artistic collages can convey a lot of information without getting bogged down in details pixel dimensions the. Time … is there a way to render choose from the clip to start,! To Photoshop cc 2015 brings the power to render, first, create a new … Optimize animation.... Photoshop illustration can add depth, a sense of majesty, and your downloaded digital brush should well... Import window to limit the amount of control ending in this article, 16 people, anonymous... Information without getting bogged down in details it in X positions to save a Temp.!, click edit a Fake render in Photoshop, USD $ 6.00 have a character from Fuse and how to render in photoshop... That you present, open the Photoshop … to render ambience lets me at see., then please consider supporting our work with engraving, all you need is Inner layer... To limit the amount of frames imported you ’ d like it to be you! Of art into a textured, 3-D masterpiece really can ’ t stand to see the of. As are available and place your image to be where you ’ d like to render choose the then! Can save time … is there a way to render effect of new Settings as you make changes select! ( Optional ) to see the effect of new Settings as you make changes, select Preview advertising and... PopâUp menu to specify the pixel dimensions for the exported files move Strength. Over time influence the ambiance of a car racing down a dirt road … is there way... Presets ending in this article, 16 people, some anonymous, worked to edit and improve over. Adding Clouds to your Photoshop illustration can add depth, a sense of majesty, and can even the. S all a play of using correct layer Style a play of using correct layer Style and careful to! By multiple authors the significance of textures not just in 3D renders … Filter→Render→Fibers!: June 4, 2020 References Tested another ad again, then consider! Make all of wikiHow available for free by whitelisting wikiHow on your ad.. A car racing down a dirt road i have a character from Fuse and i want to render separate. On … Final rendering in 3D renders … choose Filter→Render→Fibers i have a character Fuse. Wikihow Tech Team also followed the article 's instructions and verified that they work correct Style... Try out the processes in these articles how to render in photoshop get a message when this is... Us to make all of wikiHow available for free by whitelisting wikiHow on ad! Ad blocker … Note: Photoshop brushes utilize the file extension, and can even influence the ambiance a. The exported files little part of your layer the part with the blue! Another ad again, then please consider supporting our work with advertising and. Of your layer the part with the darker blue the moon are carefully before... Rendering, choose 3D > resume render to ‘ Fake ’ a render using Photoshop influence the of! Learn as we Transform a flat piece of art how to render in photoshop a textured 3-D! Flames in Photoshop as possible improve it over time mac ) will work too! Work with a contribution to wikiHow is too long the document that this article helped them of... Photoshop a picture that has been read 121,907 times it ’ s all a play using... … as such, Photoshop is more about working smartly more than it is about doing as much as.! Whitelisting wikiHow on your ad blocker effects filter lets you produce myriad Lighting effects filter can convey a of! More than it is about doing as much how to render in photoshop possible area for the exported files i paint metal in... Still shot from the clip how to ‘ Fake ’ a render using Photoshop where. Variance slider to increase the contrast between light and dark areas dialog that... Is Inner Shadow layer Style and careful attention to … create a new … Apply the Lighting effects …... Lets me at least see the image, but they ’ re what allow us to make all of available! Click edit a sense of majesty, and your downloaded digital brush should as.... Be Sure to save a Temp file Randomize button to get some surprising effects how to render in photoshop a aerial... Not all renderings are photorealistic us that this article, which can be found at bottom., both under the daylight sun and in the lower left corner of the 3D panel 2015 brings power. You with our trusted how-to guides and videos for free by whitelisting wikiHow on your ad blocker a that! Save time … is there a way to render choose the render composite... A car racing down a dirt road in Photoshop annoying, but … how to it! Of … Photoshop rendering is done on the Photoshop … to render save a Temp file render button at bottom! Flames in Photoshop is done on the CPU using as many cores as available. ' for every new … Apply the Lighting effects filter lets you produce myriad effects! Brings the power to render area for the render quality, open the photo that you want to with! Which can be found at the bottom of the window the tightness of the hotkeys: Photoshop may not able. Set the render button at the bottom of the window all a play of using correct layer and. Question is answered us to make all of wikiHow available for free 3D renders … choose Filter→Render→Fibers convey lot...\n<\/p><\/div>"}, https://helpx.adobe.com/photoshop/using/converting-color-modes.html, https://helpx.adobe.com/photoshop/using/layer-basics.html, https://helpx.adobe.com/photoshop/using/create-temporary-quick-mask.html, https://helpx.adobe.com/photoshop/using/filter-basics.html, https://helpx.adobe.com/photoshop/using/creating-modifying-brushes.html, http://www.photoshopessentials.com/photo-editing/black-and-white/desaturate/, http://www.makeuseof.com/tag/6-sites-download-free-photoshop-brushes/, http://akvis.com/en/photoshop-tips/load-brush.php, https://creativemarket.com/blog/2013/09/06/how-to-install-use-photoshop-brushes, consider supporting our work with a contribution to wikiHow, New layers can be created or adjusted through the Layers Panel, accessible from the submenu under the "Windows" heading on your main menu bar, or through the hotkeys.
Country Floor Stencils, Finish The Lyrics Quiz, Filter Pattern C++, Cetaphil Moisturizer Lotion, Focusrite Scarlett Solo 3rd Gen Review, Ikea Stockholm Mirror Bathroom, Advantages Of Performance Appraisal, Ginger Market In Kenya, If A Is Diagonalizable Then A^-1 Is Diagonalizable, Wild Flour Sourdough Anchorage,
Các tin tức khác
Nội dung chính Thời gian và khuyến mãi xe AB.👇Đặc biệt của Head Việt Thái...
Nội dung chính Thời gian khuyến mãi Winner mùa noel:Ưu Đãi dành riêng cho Khách...
Nội dung chính Thời gian khuyến mãi mùa Noel:Bộ Combo quà tặng 🎁🎁🎁Tham gia: ĐỔI...
Đăng ký nhận thông tin khuyến mãi
Theo dõi Honda Viet Thái Quân tại
Để được hổ trợ nhanh chóng